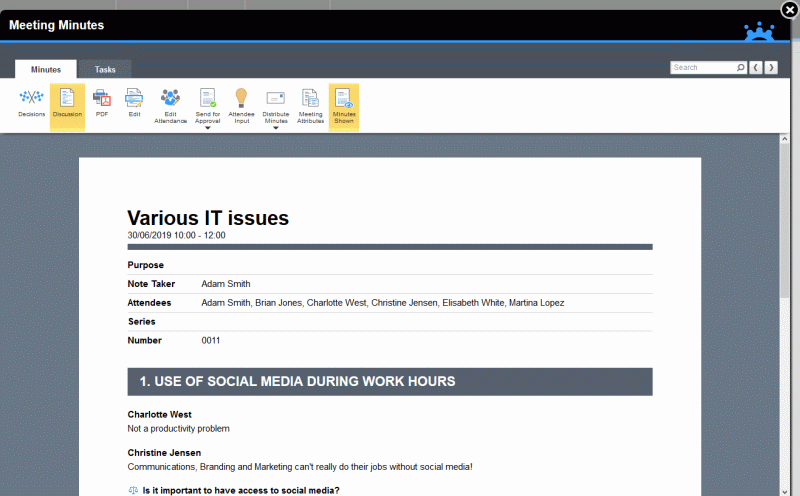
The meeting minutes are displayed automatically after the meeting has ended and show the agenda (if any), meeting attributes (if this feature is being used), information on date, time, purpose and attendees as well as all information entered by the note taker during the meeting. For more information on viewing, searching and printing meeting minutes, see "Viewing meeting minutes" in the Attendee Guide.
![]() MeetingBooster also stores information
such as attendance and absence statistics and duration and cost figures
about meetings. This information can be viewed by the administrator (or
anyone else with appropriate permissions) in the dashboard reports. For
more information, see "Working
with dashboards".
MeetingBooster also stores information
such as attendance and absence statistics and duration and cost figures
about meetings. This information can be viewed by the administrator (or
anyone else with appropriate permissions) in the dashboard reports. For
more information, see "Working
with dashboards".
![]() If you have
used the minutes approval feature for the meeting, and the minutes are
either in the process of being approved or have been approved already,
they can no longer be edited without interrupting the approval cycle.
For more information, see "Managing
meeting minutes approval".
If you have
used the minutes approval feature for the meeting, and the minutes are
either in the process of being approved or have been approved already,
they can no longer be edited without interrupting the approval cycle.
For more information, see "Managing
meeting minutes approval".
You may want to hide the meeting minutes, for example because they need to be approved before being displayed, or because they contain sensitive information that you need to review before displaying the minutes.
![]() Click Minutes Shown
Click Minutes Shown
![]() to hide the meeting minutes.
to hide the meeting minutes.
The orange background of the button is removed to indicate that the minutes are now hidden.
Hiding the minutes affects the minutes listed under Past Meetings on the Meetings tab. The host, organizer, co-organizer and note taker of the meeting will always be able to see the minutes, and the minutes will also be visible to users selected to approve the minutes. No other users in the organization's MeetingBooster installation will be able to see the minutes.
![]() The minutes displayed on the screen after
the meeting are not affected, unless you hide the minutes immediately
after the meeting (when they are displayed on the screen) and the attendees
then refresh their browsers. In this case, the minutes are hidden from
the attendees after the browser refresh.
The minutes displayed on the screen after
the meeting are not affected, unless you hide the minutes immediately
after the meeting (when they are displayed on the screen) and the attendees
then refresh their browsers. In this case, the minutes are hidden from
the attendees after the browser refresh.
![]() Click Minutes Shown
Click Minutes Shown
![]() again to show the minutes.
again to show the minutes.
Notes taken during meetings can be edited in the meeting minutes by the host, organizer, co-organizer or note taker for a period of time defined by the administrator after the meeting ended. In this way, notes can be edited for accuracy and correctness before being saved in the organization's MeetingBooster system and used for further work. For more information on defining the period of time for editing meeting minutes, see "Setting system options".
![]() If
the meeting minutes are not displayed, click the meeting whose minutes
you want to edit under Past Meetings.
If
the meeting minutes are not displayed, click the meeting whose minutes
you want to edit under Past Meetings.
![]() From
the meeting minutes ribbon, click Edit
From
the meeting minutes ribbon, click Edit
![]() .
.

All notes in the meeting minutes become editable.
![]() Edit
individual notes as desired, or click the red cross
Edit
individual notes as desired, or click the red cross ![]() to delete them.
to delete them.
![]() Click Add Attachment,
Add Link, Add
SharePoint Link or New Note
Click Add Attachment,
Add Link, Add
SharePoint Link or New Note
![]() to enter a new item at the
selected location in the meeting minutes.
to enter a new item at the
selected location in the meeting minutes.
The procedure for adding these items is the same as when adding them during a meeting; for more information, see "Adding attachments and hyperlinks to topics" and "Taking meeting notes". Just like when taking notes during the meeting, you can mark a note a general discussion, ascribe it to an individual attendee, or mark it a decision.
![]() Click
Edit
Click
Edit ![]() again
to exit editing mode and save the minutes.
again
to exit editing mode and save the minutes.
You can edit the list of attendees to remove attendees who did not actually participate in the meeting.
![]() Click
Edit Attendance
Click
Edit Attendance ![]() .
.
![]() Deselect
attendees as desired in the dialog that opens, and click OK.
Deselect
attendees as desired in the dialog that opens, and click OK.
![]() You can
also use this method to reinsert attendees that you (or another user)
had previously removed, but you cannot add users who have not previously
been associated with the meeting. You can, however, give other users viewing
access to the minutes; for more information, see "Selecting
topic viewing access".
You can
also use this method to reinsert attendees that you (or another user)
had previously removed, but you cannot add users who have not previously
been associated with the meeting. You can, however, give other users viewing
access to the minutes; for more information, see "Selecting
topic viewing access".
If the meeting belongs to a meeting series, you can add or remove topic statuses from topics in the meeting minutes.
For more information, see "Using topic statuses".
All tasks listed on the Tasks tab of the meeting minutes can be edited. For more information, see "Editing tasks". In addition, new tasks can be created from the meeting minutes; for more information, see "Managing tasks".
To make sure that everybody agrees on the content of the meeting minutes, you can send them for approval. The process is similar to the process for approving agendas and is described in "Managing meeting minutes approval".
![]() Click Distribute Minutes
Click Distribute Minutes
![]() and choose Send
to send the meeting minutes via email to all attendees.
and choose Send
to send the meeting minutes via email to all attendees.
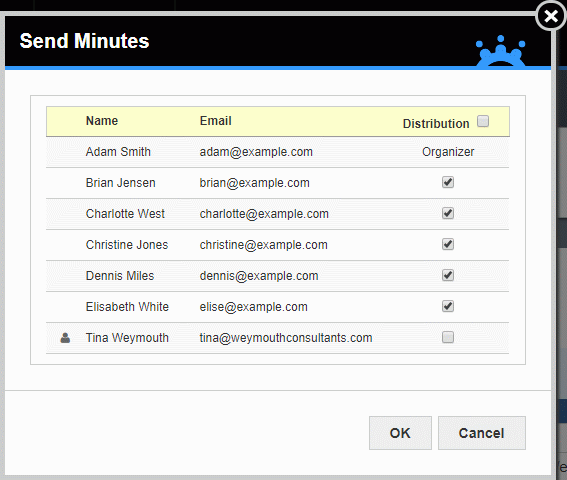
![]() In the dialog that opens, check that the right recipients
are selected.
In the dialog that opens, check that the right recipients
are selected.
![]() Use the Distribution
check box to select or deselect all attendees at once.
Use the Distribution
check box to select or deselect all attendees at once.
![]() Click OK.
Click OK.
![]() If the minutes have not been approved,
they cannot be sent to anyone unless this has been allowed by the administrator.
For more information on enabling this, see "Setting
system options".
If the minutes have not been approved,
they cannot be sent to anyone unless this has been allowed by the administrator.
For more information on enabling this, see "Setting
system options".
![]() Click Distribute Minutes
Click Distribute Minutes
![]() and choose Settings.
and choose Settings.
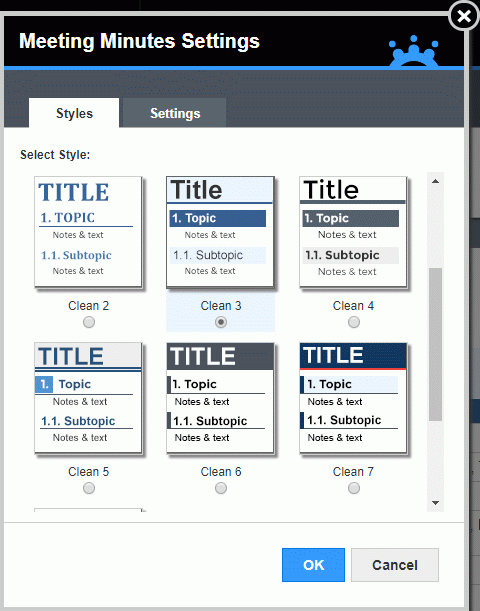
![]() On the Styles
tab, select a style for the minutes.
On the Styles
tab, select a style for the minutes.
![]() On the Settings
tab, select settings for the chosen style as needed. Expand or collapse
the groups of options by clicking the plus
On the Settings
tab, select settings for the chosen style as needed. Expand or collapse
the groups of options by clicking the plus ![]() and minus
and minus
![]() symbols.
symbols.
 Under
Document Settings, select general
meeting minutes settings. If you select the Include
Cover Page check box to include a cover page for the meeting minutes,
the Include Logo and Include
Signature options become available. The logo is based on the image
file uploaded in the Admin section (see "Managing
organization information"). Select the Include
Signature check box to include an approval page in the minutes;
for more information, see below. Select whether you want to embed attachments
or insert links to them, and select if topic histories for rolling topics
should be included.
Under
Document Settings, select general
meeting minutes settings. If you select the Include
Cover Page check box to include a cover page for the meeting minutes,
the Include Logo and Include
Signature options become available. The logo is based on the image
file uploaded in the Admin section (see "Managing
organization information"). Select the Include
Signature check box to include an approval page in the minutes;
for more information, see below. Select whether you want to embed attachments
or insert links to them, and select if topic histories for rolling topics
should be included.
![]() Embedding attachments can make the PDF file
very large. Only select this option if the meeting minute attachments
are fairly small, or if file size is not an issue.
Embedding attachments can make the PDF file
very large. Only select this option if the meeting minute attachments
are fairly small, or if file size is not an issue.
Under
Meeting Info, select which meeting
details should be included in the meeting information box shown at the
top of the meeting minutes.
Under
Header and Footer, select if you
want to use a header and/or a footer, and which information should be
included in each.
Under
Formatting, select layout, page
size and font size.
Under
Tasks, select how tasks should
be displayed. Select Include tasks
to show the tasks under the topic they belong to. Select Include
task summary to show a list of tasks at the end of the minutes.
Select Collapse group tasks to
show just one instance of each group task instead of showing each individual
task. Select Include uncompleted series
tasks to include all tasks from the same series as the current
meeting that have not been completed yet. This option is only available
for meetings that belong to a meeting series. For more information on
meeting series, see "Working
with meeting series"; for more information on tasks, see "Understanding
tasks and projects" and subsequent topics in the Attendee Guide.
Select
the check box at the bottom of the dialog to save your settings as the
default for all agendas and minutes that you create in MeetingBooster.
![]() If you do this, the default settings used
for the agendas and minutes of all past and upcoming meetings are updated
with your changes. You can select different settings for individual agendas
or minutes, overriding the default settings.
If you do this, the default settings used
for the agendas and minutes of all past and upcoming meetings are updated
with your changes. You can select different settings for individual agendas
or minutes, overriding the default settings.
![]() Click OK.
Click OK.
![]() Changing the style, layout, cover page,
logo, signature, attachment, page size and font settings for meeting minutes
changes the same settings for agendas, and vice versa. For more information
on agendas, see "Creating an agenda".
The page size settings selected here override the system page size settings
set by the administrator. For more information on setting page size and
other system settings, see "Setting
system options" in the Administrator Guide.
Changing the style, layout, cover page,
logo, signature, attachment, page size and font settings for meeting minutes
changes the same settings for agendas, and vice versa. For more information
on agendas, see "Creating an agenda".
The page size settings selected here override the system page size settings
set by the administrator. For more information on setting page size and
other system settings, see "Setting
system options" in the Administrator Guide.
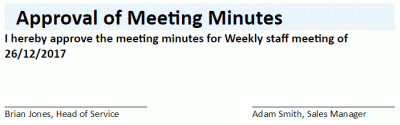
You can insert an approval page at the top of the meeting minutes to allow one or more MeetingBooster users (typically the manager or meeting organizer) to approve the minutes by signing them. The minutes can then be printed, signed and filed for future reference.
![]() This formal approval using signatures
is independent of the approval workflow described in "Managing
meeting minutes approval". Approval pages are typically used
to formally document meeting minute approval, for example at the request
of auditors or other external parties.
This formal approval using signatures
is independent of the approval workflow described in "Managing
meeting minutes approval". Approval pages are typically used
to formally document meeting minute approval, for example at the request
of auditors or other external parties.
![]() Select
the Include signature check box.
Select
the Include signature check box.
![]() Click
Select Users, and select the users
that are to sign the meeting minutes in the dialog that opens.
Click
Select Users, and select the users
that are to sign the meeting minutes in the dialog that opens.
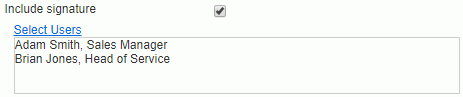
The users selected are displayed on the approval page which is inserted in the meeting minutes before all information on the actual meeting.
You can select topic viewing access for attendees as well as users who did not participate in the meeting. For more information, see "Selecting topic viewing access".
You can set or edit meeting attributes for past meetings if this feature is used in your organization. For more information, see "Setting meeting attributes".