 Click the appropriate button
 During the meeting, the note taker can enter discussions and decisions for individual topics as well as the entire meeting. Discussions and decisions are collectively called notes.
All notes entered are immediately visible to all attendees of the meeting and will be included in the meeting minutes. As such, they are a great way of recording who said what during a meeting. In addition, notes are used in several dashboard reports (if this feature is used; for more information, see "Working with dashboards"), and the more accurate your notes, the better your dashboard reports.
You can add several decisions for each topic.
If the meeting belongs to a meeting series, the note taker can also assign topic statuses during the meeting. For more information, see "Using topic statuses".
The note taker can customize his or her meeting workspace to make it easier to work with notes:
 Click the appropriate button
 ![]() at the
top right of the meeting workspace to select if there should be two or
three columns in the meeting workspace.
at the
top right of the meeting workspace to select if there should be two or
three columns in the meeting workspace.
When three columns are selected, the note editor is positioned to the right of the note card.

These settings only apply to the note taker's meeting workspace and do not affect those of other attendees.
 Select
the topic that the note applies to on the agenda.
![]() If you are both host
and note taker, selecting a different topic than the one currently being
discussed will update the topic pane for all attendees, in effect switching
to a different agenda topic. For more information, see "Navigating from topic to topic"
in "Hosting
a meeting".
If you are both host
and note taker, selecting a different topic than the one currently being
discussed will update the topic pane for all attendees, in effect switching
to a different agenda topic. For more information, see "Navigating from topic to topic"
in "Hosting
a meeting".
 On
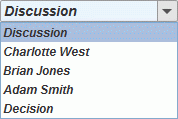
the drop-down in the note editor, select Discussion
if the note is a general note applying to all attendees, select the name
of an attendee if the note applies to just this attendee, or select Decision if entering a decision
for the topic.

![]() You can
also enter a decision by clicking Decision
You can
also enter a decision by clicking Decision
![]() and entering the decision
as described below.
and entering the decision
as described below.
 Enter
the note text.

 (Optional)
Format the note text using the buttons at the top of the note editor.
![]() Instead
of clicking the Bold,
Italics and Underline
buttons, you can use the keyboard shortcuts Ctrl + B, Ctrl + I and Ctrl
+ U.
Instead
of clicking the Bold,
Italics and Underline
buttons, you can use the keyboard shortcuts Ctrl + B, Ctrl + I and Ctrl
+ U.
 (Optional) Add a hyperlink by clicking the Link
button
 ![]() and entering the
name and URL of the link in the dialog that opens.
and entering the
name and URL of the link in the dialog that opens.
 Click
Save to save the note.
![]() You can enter several
decisions for the same topic.
You can enter several
decisions for the same topic.
 Click the note to be edited.

 Edit and save the note in the note editor.
You can move a note up and down on the note card, or move it to another topic, using drag and drop.
 Click the note to be moved, hold down the mouse button,
and drag it to the desired location: further up or down on the note card
for the current topic, or to a different topic in the agenda.
A blue box shows where the note will be located when you release the mouse button. In the example below, a note is being moved up so that it appears at the top of the note card for the same topic.

In the example below, a note is being moved from one topic to another one (Why an external audit, highlighted in blue).

 Release the mouse button to move the note to the selected
location.
 Click
the red cross
 ![]() next to the note
to be deleted.
next to the note
to be deleted.