By default, users can only log into MeetingBooster using their MeetingBooster accounts. However, you can give users the option of logging using third-party authentication services. Depending on the options you enable, several authentication options can be enabled at the same time, letting your users choose how they want to log in. Some options, however, are mutually exclusive as described below.
![]() Your use of third-party
services for authentication or other purposes is governed by the terms
of service of those third-party services as these may be updated from
time to time. MatchWare assumes no responsibility for your actions on
any website owned and operated by third parties, or for your use of accounts,
IDs or other credentials created or used on such websites.
Your use of third-party
services for authentication or other purposes is governed by the terms
of service of those third-party services as these may be updated from
time to time. MatchWare assumes no responsibility for your actions on
any website owned and operated by third parties, or for your use of accounts,
IDs or other credentials created or used on such websites.
![]() For more information on managing MeetingBooster
user accounts, see "Viewing users"
and all subsequent topics in the Managing
users section of the Administrator Guide.
For more information on managing MeetingBooster
user accounts, see "Viewing users"
and all subsequent topics in the Managing
users section of the Administrator Guide.
 Click Settings
 ![]() and
select Admin.
and
select Admin.
 Click
Authentication under System
in the menu.
 Click
the tab of the authentication option you want to set up and enable.
 Complete
the set-up steps required on the selected tab, complete any additional
procedures required outside MeetingBooster, and click Save.
See below for more information on each authentication option.
![]() All third-party authentication options require you to set up an ID or
other credentials with the third-party service in question. Since the
set-up procedures for third-party services occasionally change, this documentation
does not cover them in detail but only describes the procedures you need
to follow in MeetingBooster. Please refer to the website or documentation
of the selected service for detailed and up-to-date instructions.
All third-party authentication options require you to set up an ID or
other credentials with the third-party service in question. Since the
set-up procedures for third-party services occasionally change, this documentation
does not cover them in detail but only describes the procedures you need
to follow in MeetingBooster. Please refer to the website or documentation
of the selected service for detailed and up-to-date instructions.
![]() Each authentication
option may rely on browser cookies to work, and to keep users signed in.
Each authentication
option may rely on browser cookies to work, and to keep users signed in.
This is the default login option. Users must enter the credentials of their MeetingBooster user profiles to log in. Using this option, users can log into MeetingBoster from any device that allows them to connect to the MeetingBooster site.
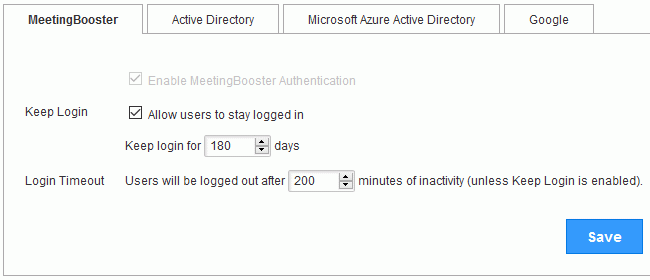
 (Optional;
only if Active Directory or Azure Active Directory authentication is enabled)
Disable MeetingBooster authentication if you do not want your users to
have access to this option.
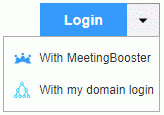
![]() If you enable Active
Directory authentication but do not disable MeetingBooster authentication,
users will be able to select if they want to use their MeetingBooster
or domain (Active Directory) account on a drop-down on the Login
button on the MeetingBooster login page.
If you enable Active
Directory authentication but do not disable MeetingBooster authentication,
users will be able to select if they want to use their MeetingBooster
or domain (Active Directory) account on a drop-down on the Login
button on the MeetingBooster login page.
 Select
whether users should be allowed to stay logged in, and for how long. If
you deselect this option, users will not be able to select the Keep
me logged in check box on the MeetingBooster login page.
 Select
how long users must be inactive in MeetingBooster before being logged
out automatically.
 If you have enabled the
Keep Login
feature (and users select the check box on their login page), users stay
logged in until their login expires (because the time limit defined under
Keep login for has been reached).
They can leave and re-enter MeetingBooster as they wish without having
to log in again (unless they actively log out).
 If you disable the Keep Login feature, users stay logged
in until they actively log out, or until the time limit for inactivity
(Login Timeout) is reached, in
which case they are logged out automatically.
This option allows users to log in using their domain login credentials; the credentials are checked against the local Active Directory service. This authentication option requires that MeetingBooster is hosted locally, and that you do not use Microsoft Azure Active Directory authentication. Using this option, users can log into MeetingBoster from any device that allows them to connect to the MeetingBooster site and sign into their domain accounts.
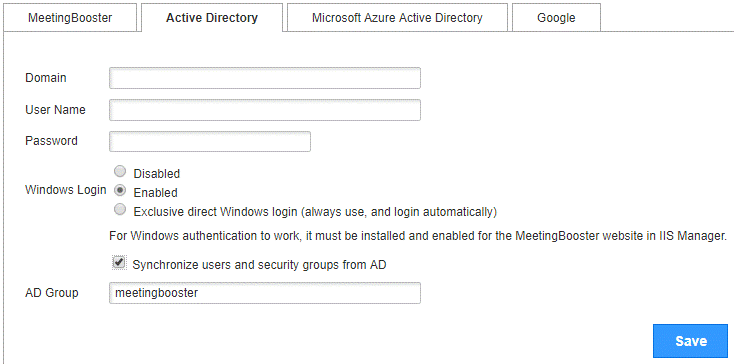
 Enter
the Active Directory domain, user name and password.
 Select
a Windows login type:
Disabled: There is no Windows button on the MeetingBooster login page. Users must sign in using their domain login credentials.
Enabled: A Windows button is shown on the MeetingBooster login page. Users who are already signed in using their domain login credentials (for example by logging into their Windows PCs) can click the Windows button to log in without providing any login credentials. Users who are not already signed in must provide their domain login credentials when clicking the button.
![]() The browser uses Windows
authentication to log the users in; you must configure user browsers to
allow this authentication for the MeetingBooster domain. In addition,
Windows authentication
needs to be installed and enabled for the MeetingBooster website on the
IIS server. For more information, see the documentation for the
browser (or browsers) used by your users, and for the IIS server.
The browser uses Windows
authentication to log the users in; you must configure user browsers to
allow this authentication for the MeetingBooster domain. In addition,
Windows authentication
needs to be installed and enabled for the MeetingBooster website on the
IIS server. For more information, see the documentation for the
browser (or browsers) used by your users, and for the IIS server.
Exclusive direct: Users are automatically logged into MeetingBooster using their domain login credentials when they go to the organization's MeetingBooster site. If you select this, users can only use Active Directory authentication and cannot choose other login options.
 Select
whether MeetingBooster users and security groups should be synchronized
with Active Directory, and enter the name of the Active Directory group
to synchronize with.
There is no logout option in MeetingBooster for users who have signed in using their domain login credentials controlled by Active Directory. As long as the Active Directory login is valid, they can access and leave MeetingBooster as they wish. When they sign out of their domain accounts, they are also logged out of MeetingBooster.
![]() For more information on Active Directory authentication, please refer
to Microsoft documentation.
For more information on Active Directory authentication, please refer
to Microsoft documentation.
This option allows users to log in using their Microsoft accounts; authentication is handled by the web-based Microsoft Azure Active Directory service. This option requires that you do not use Active Directory authentication. Using this option, users can log into MeetingBoster from any device that allows them to connect to the MeetingBooster site and sign into their Microsoft accounts.
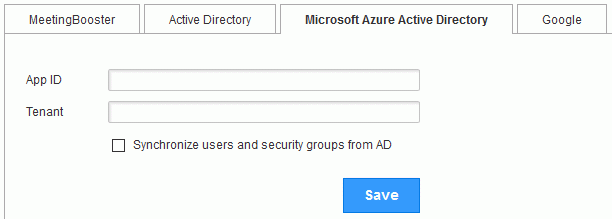
 Enter
the App ID and Tenant for the Azure Active Directory account to be used.
 Select
whether MeetingBooster users and security groups should be synchronized
with Azure Active Directory.
Users who have already signed into their Microsoft accounts are automatically logged into MeetingBooster when they go to the organization's MeetingBooster site. Users who have not already signed into their Microsoft accounts are redirected to a Microsoft authentication service which handles the sign-in procedure. When they have been authenticated by Azure Active Directory, users are redirected back to the MeetingBooster site and logged in.
Users who log in using Microsoft accounts controlled by Azure Active Directory stay logged into MeetingBooster until they actively log out of MeetingBooster or sign out of their Microsoft accounts. Logging out of MeetingBooster also signs the user out of the Microsoft account, and vice versa. In order to log back into MeetingBooster, users must sign into their Microsoft accounts.
![]() For more information on Azure Active Directory authentication, please
refer to Microsoft documentation.
For more information on Azure Active Directory authentication, please
refer to Microsoft documentation.
This option allows users to log in using their Google accounts by clicking a Google login button on the login page. Using this option, users can log into MeetingBoster from any device that allows them to connect to the MeetingBooster site and the web-based Google authentication service. Before using this option, users must associate the Google accounts they want to use for authentication as described in "Setting up calendar integration and Google options".
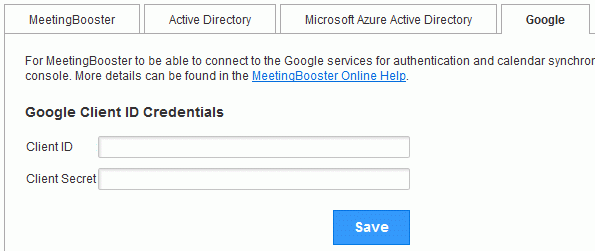
 Enter
the Client ID and Client Secret for the Google Client ID you have created
on the Google Developers Console.
When creating your project on the console, pay special attention to the following:
 Locate
and enable the Google Calendar API, and include it using the Add
Scope feature and the setting View,
edit, share and permanently delete all the calendars that you can access
using Google Calendar.
![]() This step is necessary in order to enable Google calendar synchronization
as described in "Setting
calendar integration options".
This step is necessary in order to enable Google calendar synchronization
as described in "Setting
calendar integration options".
 When
completing the Authorized
Redirect URIs field,
enter https://xxx/GoogleAuth/Callback, where xxx is
the domain name of the MeetingBooster server.
![]() Some fields on the Google Developers
Console are case sensitive; pay attention
to the casing you use in names and addresses.
Some fields on the Google Developers
Console are case sensitive; pay attention
to the casing you use in names and addresses.
When a user has signed into Google (before, or in the course of, logging into MeetingBooster), the user remains logged into MeetingBooster as long as the Google login is valid. When the user logs out of MeetingBooster, he or she is not signed out of the Google account.
![]() For more information, please refer to Google documentation.
For more information, please refer to Google documentation.