As organizer, you are responsible for creating an agenda for the meeting, but sometimes other people in the organization need to be involved in the process. MeetingBooster lets you send the finished agenda for approval to selected attendees and incorporate their suggestions and comments. If several cycles of approval are needed before the agenda can be finalized, you can even compare the different versions and undo changes between agenda versions individually.
![]() If you prefer approving agendas by having
them signed by specific users, you can include a signature in the agenda.
For more information, see "Sending
and printing an agenda".
If you prefer approving agendas by having
them signed by specific users, you can include a signature in the agenda.
For more information, see "Sending
and printing an agenda".
![]() The administrator may set up MeetingBooster
so that a meeting cannot be started unless the agenda has been approved.
For more information, see "Setting
system options".
The administrator may set up MeetingBooster
so that a meeting cannot be started unless the agenda has been approved.
For more information, see "Setting
system options".
![]() Meeting attendees can provide suggestions
and comments for the agenda even when they have not been requested to
approve it.
Meeting attendees can provide suggestions
and comments for the agenda even when they have not been requested to
approve it.
The following procedure assumes that you have created a meeting with an agenda for which you would like attendee approval.
![]() Save the meeting by clicking Save.
Save the meeting by clicking Save.
![]() On
the Agenda tab, click Send
for Approval
On
the Agenda tab, click Send
for Approval ![]() , select Select
Approvers in the submenu, and click Edit
Approvers.
, select Select
Approvers in the submenu, and click Edit
Approvers.
![]() In
the dialog that opens, select one or more approvers. You can select any
meeting attendee (except guests) or any user in the organization's MeetingBooster
installation.
In
the dialog that opens, select one or more approvers. You can select any
meeting attendee (except guests) or any user in the organization's MeetingBooster
installation.
![]() Click
Done.
Click
Done.
![]() Click
Send for Approval again, select
Request Approval in the submenu,
and confirm by clicking OK.
Click
Send for Approval again, select
Request Approval in the submenu,
and confirm by clicking OK.
The meeting is saved and closed, and an exclamation mark ![]() is shown next to the meeting
title under Upcoming Meetings.
Each attendee selected for agenda approval receives notification of the
pending approval so that they can review, and then approve or reject the
agenda. For more information on this, see "Approving
meeting agendas".
is shown next to the meeting
title under Upcoming Meetings.
Each attendee selected for agenda approval receives notification of the
pending approval so that they can review, and then approve or reject the
agenda. For more information on this, see "Approving
meeting agendas".
![]() While the agenda
is in the process of being approved, the meeting will only open in view
mode. If you need to edit it, you can click Edit
on its Agenda tab. You will, however,
be asked to confirm your intention, as this will invalidate the approvals
in progress.
While the agenda
is in the process of being approved, the meeting will only open in view
mode. If you need to edit it, you can click Edit
on its Agenda tab. You will, however,
be asked to confirm your intention, as this will invalidate the approvals
in progress.
As soon as an attendee either approves or rejects the agenda, possibly
adding suggestions or comments to justify their decision, you receive
an email notifying you of their approval or rejection. If the agenda was
approved by all approvers, a check mark ![]() is shown
in the list of meetings; if it was rejected by one or more approvers,
a cross
is shown
in the list of meetings; if it was rejected by one or more approvers,
a cross ![]() is shown instead.
is shown instead.
![]() Open the meeting again.
Open the meeting again.
 If all the approvers have accepted the agenda,
the meeting opens in view mode.
If all the approvers have accepted the agenda,
the meeting opens in view mode.
If one or more approvers have rejected the
agenda, the meeting opens in edit mode, so that you can make any necessary
changes.
![]() For the sake of efficiency, you might prefer to wait until you have received
emails from all the approvers before reviewing the agenda.
For the sake of efficiency, you might prefer to wait until you have received
emails from all the approvers before reviewing the agenda.
![]() (Optional) Compare the current agenda with previous versions
if available. For more information, see below.
(Optional) Compare the current agenda with previous versions
if available. For more information, see below.
![]() Review the attendee input, particularly if one or more
attendees have rejected the agenda. For more information, see "Adding
suggestions to an agenda".
Review the attendee input, particularly if one or more
attendees have rejected the agenda. For more information, see "Adding
suggestions to an agenda".
![]() If necessary, edit the agenda to take the approver input
into account.
If necessary, edit the agenda to take the approver input
into account.
![]() Even
if all the approvers have accepted the agenda, you can still edit the
meeting by clicking Edit. You
will, however, be asked to confirm that you want to re-edit the approved
agenda, as this will invalidate the current approvals.
Even
if all the approvers have accepted the agenda, you can still edit the
meeting by clicking Edit. You
will, however, be asked to confirm that you want to re-edit the approved
agenda, as this will invalidate the current approvals.
![]() Once you add a topic
suggestion provided by an attendee to the agenda, the attendee can no
longer edit this suggestion during further approval cycles. Likewise,
once you have marked a comment as read, it can no longer be edited by
the attendee who provided it.
Once you add a topic
suggestion provided by an attendee to the agenda, the attendee can no
longer edit this suggestion during further approval cycles. Likewise,
once you have marked a comment as read, it can no longer be edited by
the attendee who provided it.
![]() If you decide to limit the number of approvers, or conversely
include new approvers, click Send for
Approval, select Select Approvers,
and make the necessary changes.
If you decide to limit the number of approvers, or conversely
include new approvers, click Send for
Approval, select Select Approvers,
and make the necessary changes.
![]() If you have made any changes to the meeting or agenda,
click Send for Approval and choose
Request Approval to resend the
agenda for approval, and repeat the process described here.
If you have made any changes to the meeting or agenda,
click Send for Approval and choose
Request Approval to resend the
agenda for approval, and repeat the process described here.
![]() Once the agenda has been accepted by all its approvers,
send it to all the attendees. See "Sending
and printing an agenda" for more information.
Once the agenda has been accepted by all its approvers,
send it to all the attendees. See "Sending
and printing an agenda" for more information.
![]() Save
and close the meeting, which is now ready to be started at its appointed
time. A check mark
Save
and close the meeting, which is now ready to be started at its appointed
time. A check mark ![]() is
shown next to the meeting title under Upcoming
Meetings.
is
shown next to the meeting title under Upcoming
Meetings.
You can compare the agenda with any previous agenda version. If you are editing the agenda, you can also undo changes individually.
![]() Do one of the following:
Do one of the following:
In the case of an approved agenda, click Show Changes ![]() and select the agenda version you would like to compare the current version
with.
and select the agenda version you would like to compare the current version
with.
In the case of an unapproved agenda, click
Approval ![]() , choose Show Changes and select
the agenda version you would like to compare the current version with.
, choose Show Changes and select
the agenda version you would like to compare the current version with.
All the changes introduced since the selected version are identified on the agenda that appears.
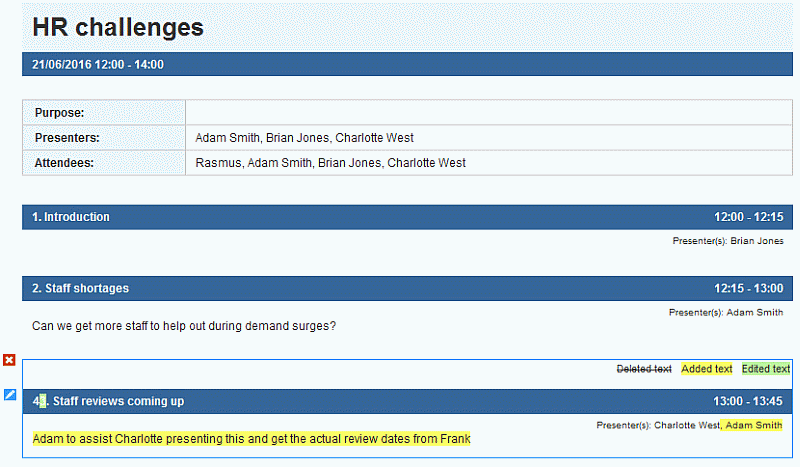
For more information about the icons identifying the changes, refer to "Approving meeting agendas".
If
you are editing the agenda, you can click  to undo
specific changes.
to undo
specific changes.